


Week 1:
Welcome to the beginning of my final VFX project at Savannah College of Art and Design. The goal of this project is to further my castability of FX by exploring two areas of Houdini that I'm only part familiar with, Pyro and POPs.
My thesis is being guided by my amazing mentor, Krzysztof. I've very glad to have his knowledge and critique for this project as I will be exploring some uncharted territory with the FX.
I will be heading into the feature side of the VFX industry post-graduation so I do want this to also be cinematic in camera movement and look development. Some strategies I have for achieving this goal are tracking of existing plates (royalty-free) instead of hand-animating cameras and including camera effects in the compositing stage (thank you to my compositor friends beforehand).
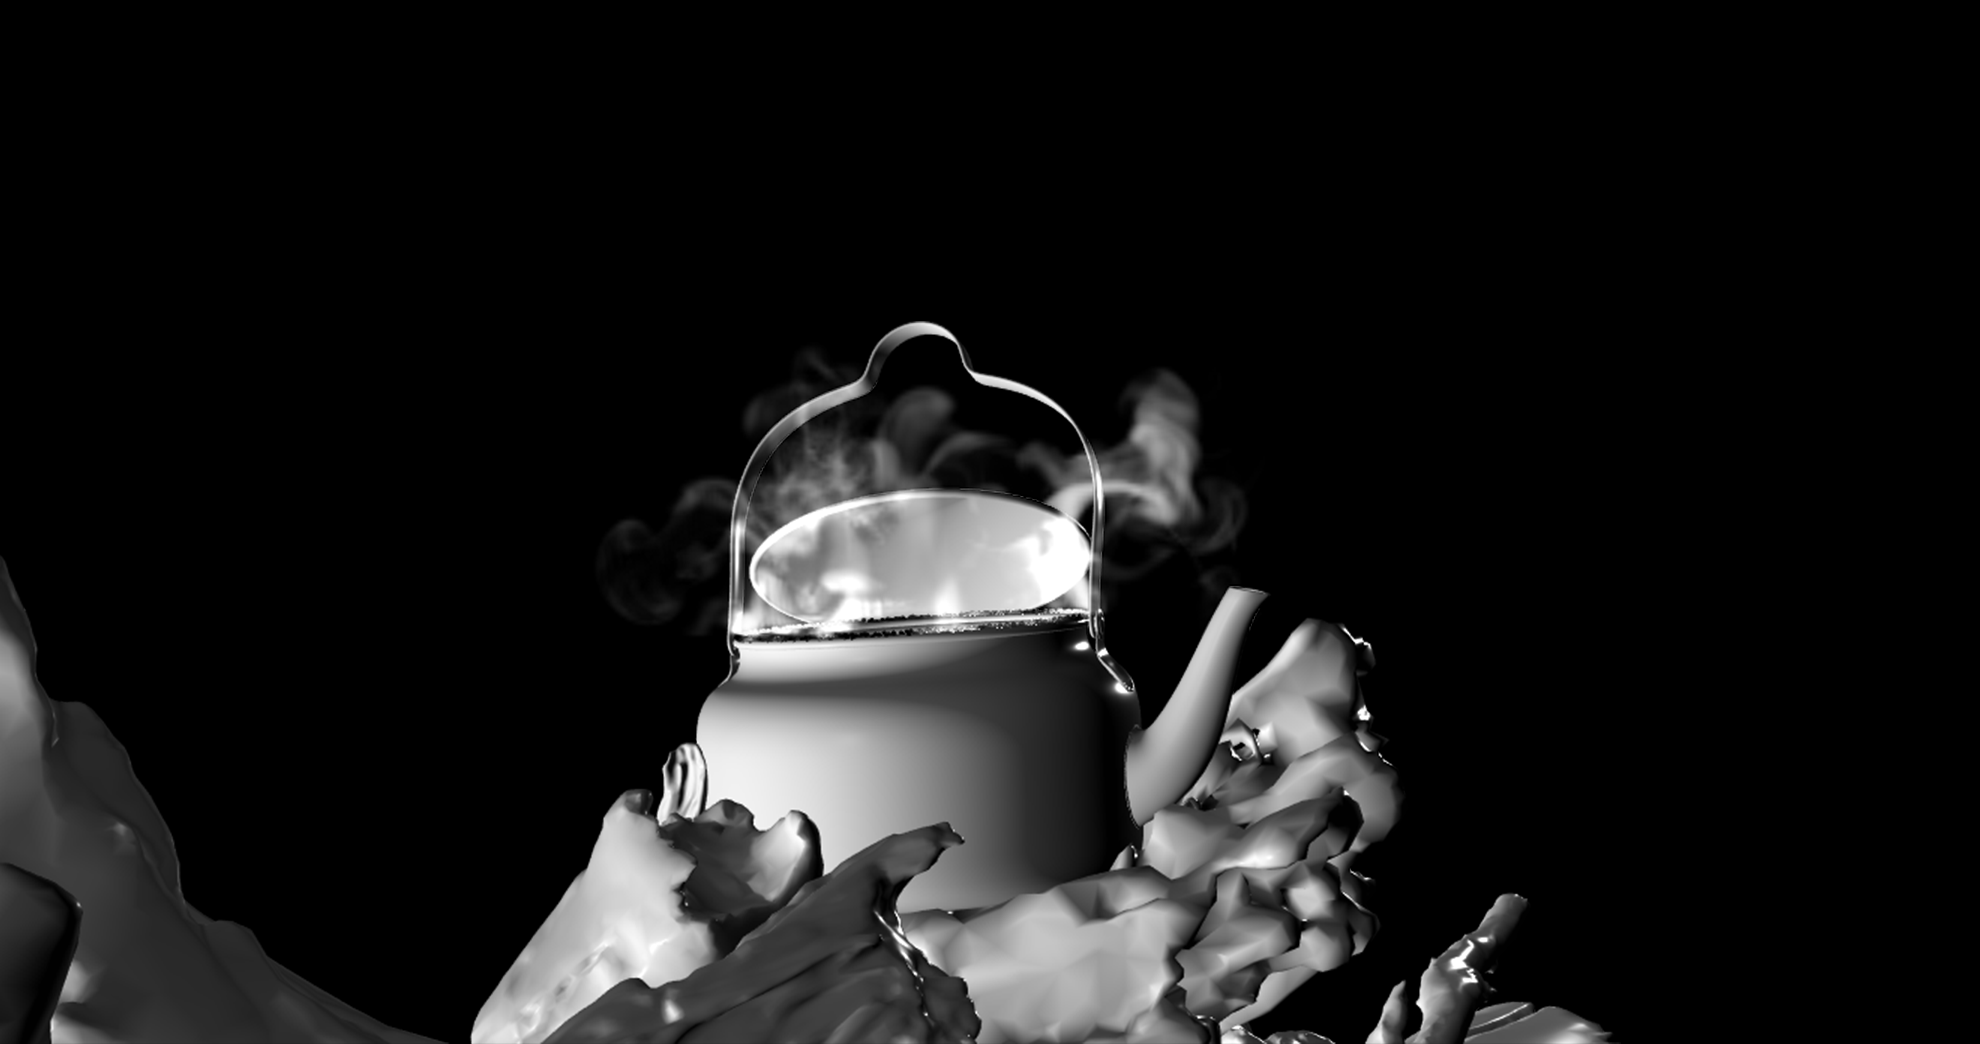
I will be responsible for all aspects (barring any run-ins on at the lighting and compositing stage) with environment models from Quixel. I will be modeling the trees using the new SideFX labs Tree Generator tools made by Ryan Gold and integrating simple motion for realism. The kettle will be modeled by me as well.
Environment Task List:
- Simple Kettle Model for FX usage
- Simple layout of firewood and pit rocks for FX usage
- Model ground using height-fields/volumes
- Model trees using Tree Generator Tools with simple motion integration
- Modify quixel textures for color coherence
- Convert all textures and hdrs to EXRs for ACES workflow
- Texture kettle, trees and ground
- Scatter assets
- ... there may be more to come, but FX are first priority
Layout Initial Iteration of Firepit (1.4.21) - Renders from RfH 23.5 using Houdini 18.5:

Occlusion Integrator

Path Tracer Integrator utilizing ACEScg colorspace (simple envlight)
Layout Iteration 1 of Firepit (1.6.21):

Occlusion Integrator (displays only half of wood assets)
In terms of look development and FX behavior, I'm going for photorealism with stylized behavior. The best way I can describe this is that the "kettle fire" in the scene is a "character" rather than effect added into a scene. I don't mean that the fire will look like a character, but rather behave like one. The stylized of the pyro movement will be further with density and shading stylization, and the integration of ember particulate that will also behave in a very designed way.


I have decided to base my motion and behavior design off the patterns of bird and insect wings loops, along with motion trails of animals that swim. That was inspired from a scene in Disney's Moana (show below) where Moana's grandmother as a stingray swims under her boat as a means to encourage and guide Moana. It is a very powerful moment in the film and the effect is designed very beautifully using various particle and volume techniques to give the stingray elegance and an ancestral wisdom feel.

Moana, courtesy of Walt Disney Animation Studios
FX Task List:
- Pyro - Kettle Fire
- Pyro - Smoke for the Kettle Fire (separate)
- Pyro - Steam from the Kettle
- SOPs - Burn maps
- POPs - Ember Particulate (multiple layers likely)
- POPs - soft ash effect on rocks
Video Reference (courtesy of Kelly Lacy on Pexels) :
Shallow Focus of Flames
Flame of Burning Firewood
Flame of Burning Firewood (Flame Closeup)
Flame Shapes
Increased Smoke
Full Forrest Scene
I will be utilizing Pixar's Renderman in Houdini for this project. Daily updates will consist of low-quality renders and high texture resolution flipbooks due to RfH not being on the farm. Normally to avoid local rendering I would default to mantra, but I decided against as I'm not satisfied with mantra volume renders especially for the render time it requires. The renders will utilize an ACES color workflow.
I will also be utilizing a USD workflow in Houdini with LOPs. It will be highly beneficial for me for layout (using physics), organization, and continuing to learn USD as it is highly used in industry. With using LOPs, I can also take advantage of Renderman's viewport rendering.
Timeline:
10 weeks (Winter Quarter):
- FX RnD completed by end of week 2
- All guts of FX are completed by week 10
- Camera and Layout is 90% completed by week 10
- Environment modeling is 60% completed by week 10
- Texturing is 50% completed by week 10
- Environment Lighting is primitive by week 10
- FX Lighting is 50% completed by week 10
- Simple Compositing is set up by week 10
10 weeks (Spring Quarter):
- Polishing of FX is completed by week 5
- Camera and Layout is completed by week 5
- Texturing is 60% completed by week 5
- Environment Lighting is 50% completed by week 5
- FX Lighting is 90% completed by week 5
- Compositing with camera effects is set up by week 7
- All aspects at 100% by midpoint of week 9 to leave a week and a half for final rendering.
- All final renders received and composited by end of week 10. (Hooray!)
19 weeks to go! Sit tight, there's lots to do!
Week 2:
Hi guys! Welcome to week 2!
I had some time over the weekend to get a couple more firepit layout iterations in and get it to a place where I feel comfortable working on the pyro more. I wanted to get that out before seriously messing with the pyro source since that is dependent on the placement of the assets.
I approached the layout more methodically: thinking "how would I build this firepit?" Big, organic tree branches first, then log pieces to fill in the holes? The log pieces more towards the bulk of the pit where I would want them to burn? Maybe have some dead branch fill to add interest to the composition.
I also fixed the kettle model a bit more and then placed it less precariously then I had before by creating a sort of "bowl" with the wood pieces.
There are about 70 Quixel assets in the scene. I plan to refine the exact position further later by using the Stage context in Houdini for the quick bullet physics. This is however more or less the final composition of the pit.
Layout - Iteration 8 - Approved!


Now to the FX! I've been first working on the main pyro: the fire (no smoke yet).
I started with a simple set up to get the sim running and then I focused on evolving the sourcing of points for the pyro source. So we know what that means... GROWTH SOLVER!
At first I used a simple sop solver with an attribute transfer to decide how many "sparks" I wanted to start the growth from. The issue is though with a transfer is that transfers very uniformly in a circular fashion.
I needed to dive into VOPs for a custom attribute transfer using point clouds and noises. Out of the box using a search radius from pcopen still produces a rounded transfer. The trick is to multiply against noises and a selection compare.
Layers of noise take in P of the previous frame and the Time to generate the noise. Those results are then converted to floats and clamped to a 0-1 range to be multipled against the Cd vector of the "active" points.
The pcopen is taking the "active" points (represented in white) and finding neighboring points within the search radius I define (which can be very small to produce a more detailed radius when mixed with noise) and produces a handle, either 0 or 1 that I can use to grab the Cd attribute of the found points.
To even further refine the search, I can multiply the Cd attribute by a random number that is under a percentage selection threshold. I have it cranked down to five percent.
Then after these operations, I use max nodes to make sure that if the point was "active" before it will still be active. Inside my growth solver, I also snagged the setup_life VOP network from a pop source node to use age and life down the road.
Particulate Research:
Something that I stumbled across this weekend that I definitely think I want to implement for one or a few of the particulate layers is a wonderful hidden gem in Houdini called the filament solver. _/(0 o 0)\_
Sounds pretty interesting right? Apparently, its been around for several years in Houdini. I saw demos as far back as version 13! I've only been using Houdini since 16.5). Here's what it does, if you don't know already:
Example Demos:
(courtesy of Erik Ferguson and K240 on vimeo)
Filaments are closed polylines that represent vortex forces. It's a simple set up to implement with a pop sim. The filament geometry is sourced into a pop source which is then fed into a source filaments node which then appends new filaments that are created (when you define it to) to the geometry subdata on the pop object.
A pop advect by filaments node is used to advect to particles using the velocity field from the filament geometry. A filament solver runs after the pop source and force nodes (and the like) which is all piped into the post-solve of the pop solver.
Its a really powerful thing to add to an already powerful pop sim for a neat effect. Any pop forces or operations you add to evolve you sim are very flexible in placement so they can be calculated in a different order to achieve a result you want, even with the added filament solver.
Definitely will be implementing!
Til next week for the first checkpoint, happy renders!
Week 3:
Welcome everyone to week 3! It's a small checkpoint week (class 5 of 20 for quarter one).
I don't have much in terms of visual progress. I was mainly researching and testing different pyro techniques. Here's what I have currently:
password: embers
Schools of Pyro:
I should mention as well I had a bit of a breakthrough with the flame shapes and I understand much more the workings of pyro than I did the previous week.
The main thing being using "x" to compensate for "y."
Example: there's a lot of temperature being injected into my sim, so I increased the cooling rate to remove 99% of that temperature every frame... sounds alright, but that was actually the wrong thing to do here.
In the previous iteration (week 2), the fire was very gassed and the flames did not achieve that licking quality. I tried microsolvers, but nothing broke up that fire the way I wanted... until I reduced the cooling rate to 60% and temperature diffusion from 20% to 1% (keeps the temperature field sharp). I also cranked up the buoyancy scale from 0.05 to 0.5.
There's many, many schools of pyro and what I mean by that is there are a lot of ways to achieve your desired result. The goal for me is to find a way that makes sense to me and allows for a range of artistic changes to refine as I go.
Another example: what fields am I injecting into my simulation? Do I actually need to use density? Short answer: no.
This works with both legacy and sparse pyro. In my case of using sparse, I removed the density field because the simulation will produce is own density anyway. I use temperature, burn, and vel (and of course, collision and collisionvel).
Burn is sort of the replacement for fuel in legacy pyro. I have it set to target the flame and divergence fields.
For flame the operation is set to "Maximum," meaning only "add" flame where there is not.
The divergence field is set to "Add" because it is not tracked frame to frame and instead "reset" every frame. Using timestep is turned off for divergence to that when more substeps are added to my simulation, the value isn't divided down to compensate for the extra subframes, it will stay the same (thank you Steven Knipping for that bit of crucial knowledge).
The temperature field obviously targets temperature using the "Pull" operation, meaning when new temperature is being sourced in, accelerate or decelerate the current simulation values to become "this", this fast. I have the acceleration strength set to 20 and deceleration set to 1.
Week 4:
Hi everyone, welcome to post 4 of 20!
Last week was a bit light on getting work done. I did work on the Renderman volume shading a bit and getting the density to render properly for the steam, and I started setting up more sims.
Goal for week 4: catch up... more specifically -
- Get timing and collisions of main fire sim and fill fire sim correct
- Get timing and large motion of the kettle spout steam correct
- Start exploring density post processing for kettle steam sims
- Evolve fire shader to be working
Next week I'll look to have particulate so that way I have most of the effects rendering for midterms. I may also get some more textures installed and adjusted to also be rendered.
Progress:
Fire Simulations-
Flipbook of Main and Fill:
password: embers
I decided to do another fire simulation because my reference had nice collisions from fire that was sourced underneath the colliders instead of just on top of the wood.
I grabbed a portion of the large log asset and applied similar sourcing techniques as the main fire with noises.
Fixes/Caveats for this week:
BIG FIX so its in bold - Density is not written to during simulation if emit smoke is turned off or there is no density being injected or targeted. As per the documentation: "For a smokeless pyro simulation, this volume [density] has a value of 0 everywhere." Meaning my render engine will not pick it up and thus the reason it wasn't rendering in the first place, but my steam was because I was injecting density. The simulation was producing a density field, but it was empty. The lesson: You do not have to inject density into sparse pyro for it to simulate properly. However, you DO need a density field in some fashion to properly render your flames, if you chose not to inject density. The workaround if you don't want to inject density: Turn on emit smoke on the pyro solver; in the pyro-post process or look book and the pyro shader, set the density scales to 0. The documentation provides another method: (https://www.sidefx.com/docs/houdini/pyro/shading.html) - I however didn't get it working and am not using mantra anyway.
This leads me to my next caveat: the workaround mentioned above does not work with Renderman because those functions are native to Houdini shaders. I will reverting back to injecting density into my simulation for my sanity later.
Technique for sourcing volume collisions was incorrect - using volume source for collisions should be plugged into forces, instead of sourcing with the pyro fields.
When creating the VDB for collisions, make sure there are enough interior voxels, or better yet that the collision is filled (check on fill interior).
- static objects are another method you can use; it works well out of the box, but using
the volume source is more efficient bc you have that field control very easily.
- If you're using the volume source and it doesn't seem to be working here's the check
list:
- "watertight" geo; if its extruded make sure it has enough thickness or better yet if
its like a pot, cap it and then turn into a VDB
- Calculate point normals and feed that to the v attrib before making the geo VDB
- in VDB from polygons - change the distance name from "surface" to "collision";
add a surface attribute for point.v, pointing to the v VDB grid and the vector type
should be dis/vel/accel
- make sure volume source is plugged into forces for sparse pyro and sourcing for
legacy pyro
Note: The higher resolution the simulation is, the more chance for collision "leaks."
The reason to add velocities from normals to collision geo is to keep any fields from
"sticking" to the colliders.
For other stuff on volume collisions I recommend checking out HoudiniSimon's Houdini Volume Collisions series on Youtube: https://www.youtube.com/watch?v=RtmwWhnsWA8
But as always: do more research and compare what you find. I wouldn't mix the methods as he does in his video because it could get confusing.
Grid-aligned artifacts: this a pretty common issue in pyro that happens even after increasing substeps on the pyro solver due to having strong velocities on one axis (in this case the up y direction); or strong divergence in the velocity source; or the voxel centers of the sources are lining up (ex. scattered a perfect grid of points that's the source.)
In my case, I'm seeing it mainly stretching lines through the flames so I'm assuming that's due to my velocities. It may be solved when I add microsolvers to move the flames around.
Steam Simulations-
Main Spout Simulation:
Flipbook of pop source and pyro simulation:
password: embers
Made some decent progress here with steam from the spout. I have an emission motion that I quite like. I started with a pop sim, so that the source had the desired emitting motion and then the pyro solver would take care of the dissipation. There's a number of artifacts from the lack of points and high velocities from the pop sim I will be addressing next week.
Reference:
I'd like to do some more density post-processing right at the mouth of the spout to achieve a look similar to that in the second reference clip. Where there is the most speed in that area, it is less dense. Like this:

Fire Shader Progress-

Left: goal (Houdini pyro lookbook)/ Right: current Renderman volume shader from scratch
The thing that sent me down the density field rabbit hole that I mentioned earlier was trying to properly render the density of the flames. Originally, I had a big gray puff with huge voxels and no emission.
There's an example of fireball shading from the Renderman 21 documentation (https://rmanwiki.pixar.com/display/RfH/Shading+a+Fireball) , but I found this to be unsuccessful in both color and emission, mainly from the usage of the pxr blackbody. With the blackbody I got very hot pink colors. I eliminated the usage of that entirely and created custom color ranges to follow the new shader workflow that is native to Houdini.
The density is simply fed into the density primvar of the pxrvolume. Then I grabbed the flame and temperature fields for the diffuseColor and emitColor. Applying simple multiplication operations allowed me to get a pretty good result for a little bit of work. I need to work more on the temperature look and making this a light source shader, as well as making the flames appear a little more 3D.
Tip: If youre using pxrvolume and feeding a density field, change the Max Density parm on the volume shader to something higher than -1. If set to -1, it means the density will go on into infinity. For me, by setting the max density to 5 I got a much more realistic result (also in mix with some light density post-processing).
Week 5:
Welcome to Midterms Part Uno! The goal for myself for midterms was to have all of the simulations running and moving together. They are not in perfect synchronization, but this will allow me to plan better going forward into Finals Round 1.
Week 5 Renders:
Bonfire Flames:

Current Smokeless Flame DOP setup for main and fill simulations
I focused on getting more of a flowing flame look by using sharpen and turbulence. I have a large scale turbulence disabled that I will use later for the large swiping, magical motion. I will be adding more shredding to get better "licking" shapes.
Kettle Steam:
Spout:

The main improvement/change that I made was in the pop sourcing. I originally not happy with the filament solver results because it "overrode" other operations, but that was fixed by applying other operation post filament advection. I also removed my pop curve force and pop axis force because those created strong velocities that didn't work well for the wispiness of the pyro sim.
I also changed the source geo to a torus to give an emission shape that followed the rim of spout better.
Lid:
I generated source points from the kettle lid geometry and then applied a color noise to randomly select where the steam would actually emit from. I didn't want the steam to emit from all around the lid. The setup is similar to all the other pyro sims, its just a matter of tweaking the attribute data I am feeding in to determine the speed and scale of the simulation. I did make the burn attribute noise almost static and the temperature attribute noise have a longer pulse duration and larger element size to get the thicker leaks of smoke.
There was a bit of post-processing involved to clean up the density to sharpen it and make it look like it was leaking from between the lid and the base because making that collision happen in a pyro simulation isn't efficient.
PDG Single Flames and Smoke:
I did decide to end up using PDG for detail smoke and flame simulations because I am able to control and get higher quality "sparse" flames better than including it in a much larger overall source that requires more simulation time. Its a simple TOPS set up with wedges driving attributes in the simulations.

Flames PDG network
Smoke wedges -
Source wedges:
Simulation wedges: temperature "pull" acceleration strength; cooling rate
Flame wedges -
Source wedges: x/z noise offset for source selection; temperature attribute pulse duration; pop force swirl size, pulse length, and offset (offset connected to wedge index)
Simulation wedges: source index; flame lifespan; turbulence scale, swirl size, and seed (offset connected to wedge index)
For the flames specifically, I am running two caches: one for the source and one for the simulation. From the source cache, I have already have 8 source computations to feed into the simulation to use in wedging. How I source that is by reading a created attribute called "source index" that is also used in the file name so the correct variation can be called procedurally.
I limited additional wedging for the simulation to a count of 1 for the moment because the sources are very different and I already have 8 pyro simulations to run at one go (thank goodness for 128GB of ram). BUT I don't have to simulate all 8 sources. I could only do 4 that I like by targeting a value list for "source index" instead of a range from 0-7. Then I could wedge more pyro simulation parameters and still only have 8 simulations to run.
Embers Particulate:
Here is another great instance to use PDG for iterations. POPs are really fast and so I can run multiple instances of Houdini at the same time. Getting this particulate right is going to take many iterations, these are the first couple. Right now, there is just some simple forces being applied, but I plan to use VEX to program the behavior of the particles rather than 100% leaving it to chance.
The main thing here is that the embers are advected by the velocities of the smoke. The reason I didn't choose the velocities of the flames is because the embers will more likely interact and be visually compared with the smoke. The source is also pretty much the same for the smoke and flames.
Fixes and Things I Learned:
The first thing I learned over the past week is something my mentor taught me. It is a method for removing that dreadful porcini mushroom shape that plagues every simple pyro simulation.


Cursed Porcini Mushroom No Cursed Mushrooms
By using a Scalar Field DOP, you can attached one-dimensional data, such as a mask, to the smoke object and be manipulated by solvers or wrangles. The field is made of voxels.
The scalar field has similar parameters to the smoke object like division size and bounding size that should be matched accordingly, and then the data name that will be called later in the solvers. This method is meant to be applied before adding microsolvers to give a better jumping point into detailing. Any solvers you make or apply this field to should be applied first in the advection input of the pyro solver.
The example above uses gas field wrangle that I use to add noise to a "turbmask" (the data name); then a gas blur node to blur the values of the turbmask by specifying that in the field parameter; and then this manipulated data is set to the control field of a gas turbulence node. For full affect of the data, the control influence is set to 1.
Second thing: there are bugs with VDBs for Rfh 23.5. I had converted the resulting volumes of my fire in a pyro-post process node to VDBs to reduce the memory load and squash the vel attributes back into one vector. This caused clipping of data that only appeared at render time. VDBs are not the "cause" of the clipping artifact, but there's probably a bug when Renderman converts that to a F3D file at render time.
Third thing: a simple density manipulation to get smokeless flames when using Renderman. I talked about two weeks ago about how the shader requires a density field. I am getting density data greater than 0 where the temperature is 0. When I render with my color ramps, I have the black color when temperature * flame = 0. That density data rendered black, giving the appearance of "smoke." To fix, I multiplied the density and temperature fields in a volume vop. (Multiplying inside the shader didn't give expected results).
Final Thing: avoid stepping in POP simulations by changing the jitter birth time to "negative" and interpolate source to "back." This is avoids having to turn up the substeps or adding extra forces.
Now I will be focusing on the motion sequence of the FX and refining them, and getting better lighting for renders and starting compositing. Also doing some creative post-processing on the simulations, so off to VDB land! See you next week!